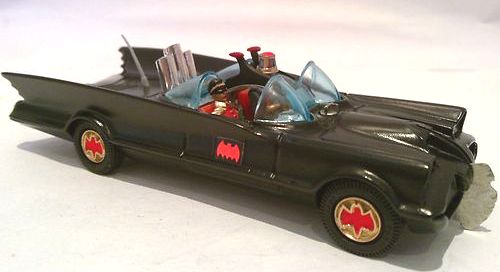
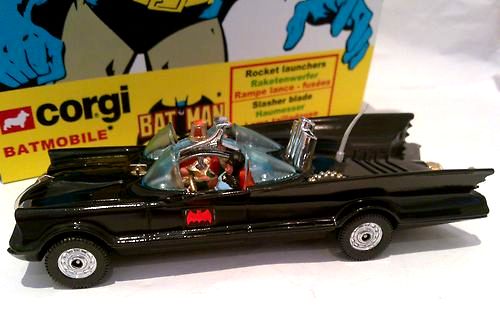
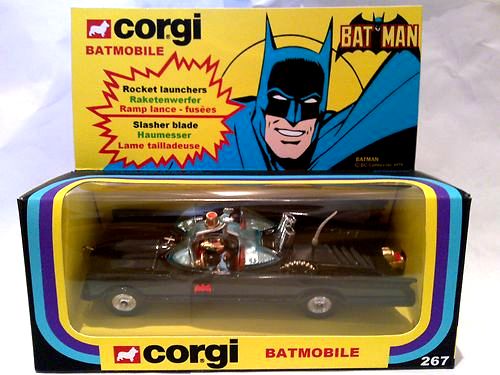
Corgi Batmobile restorations |
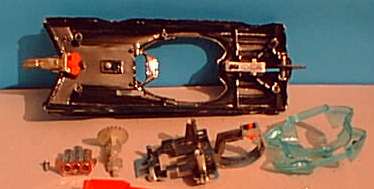
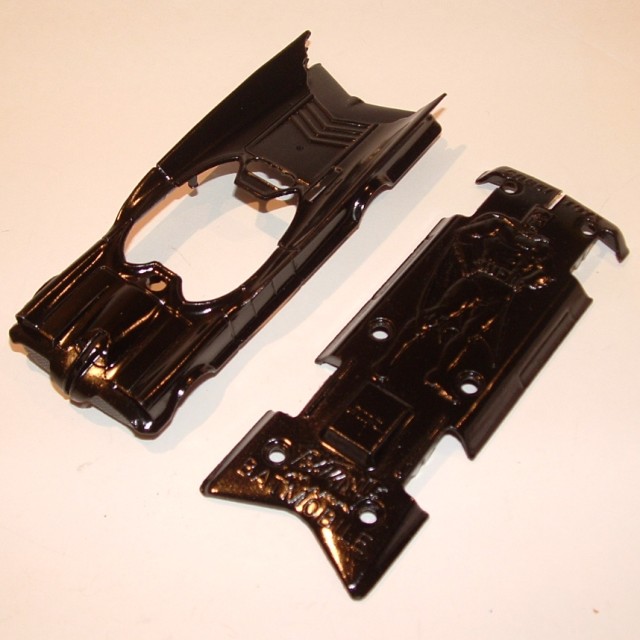
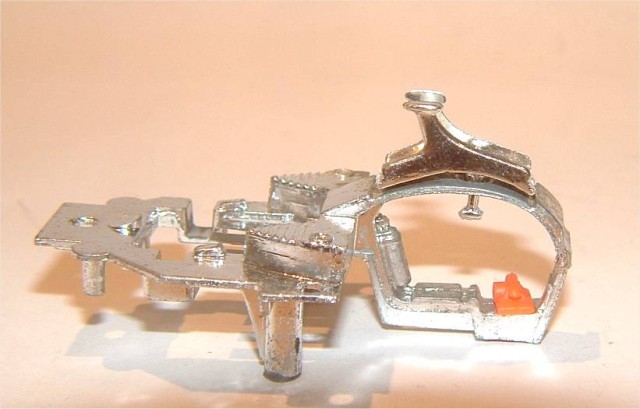
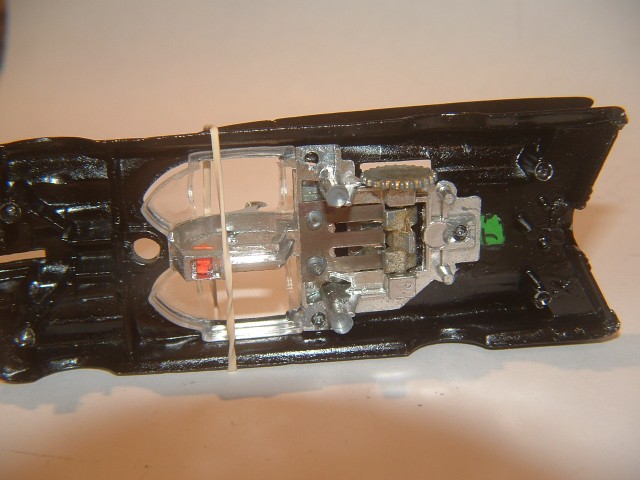
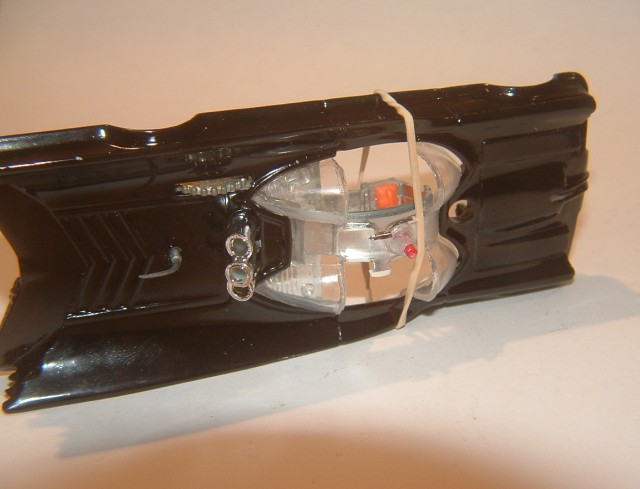
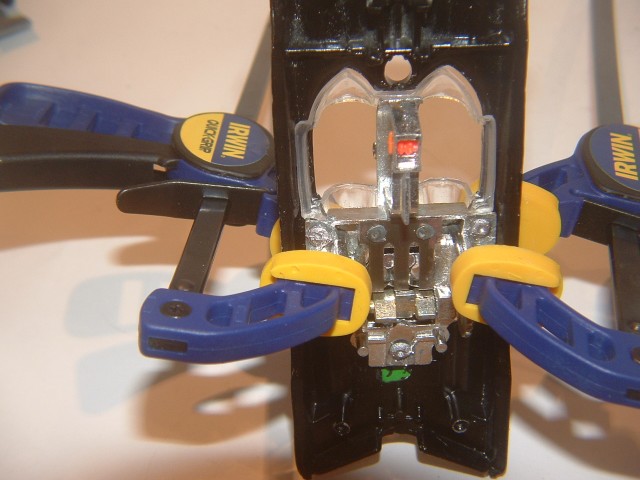
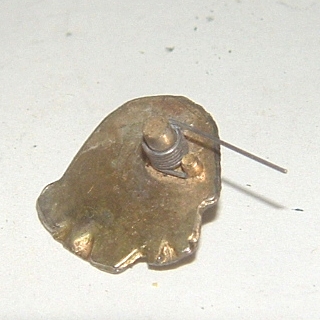
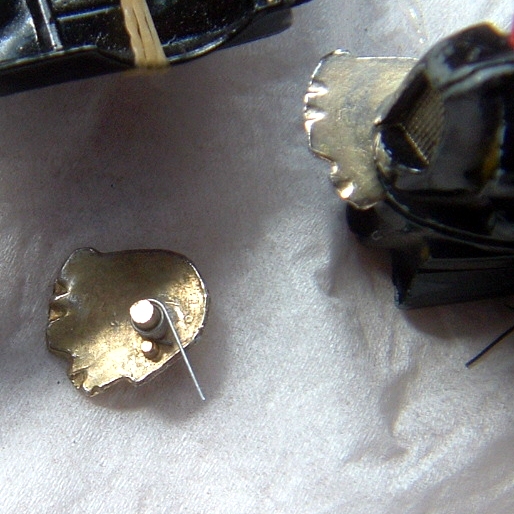
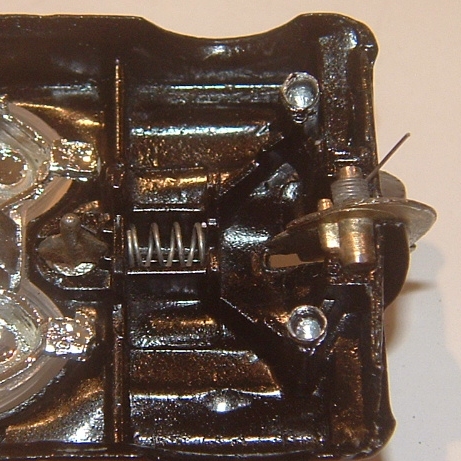
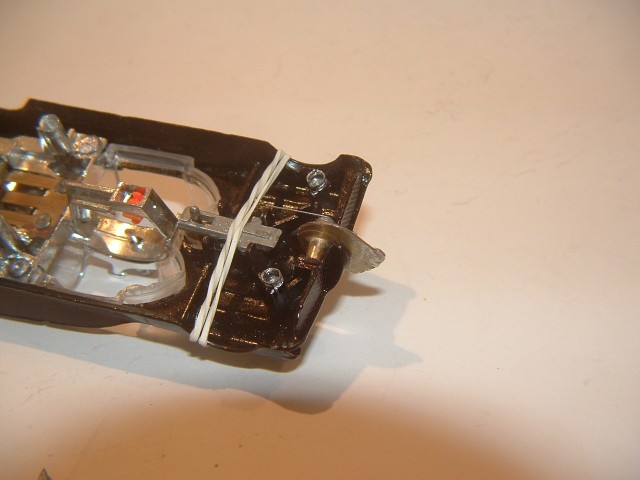
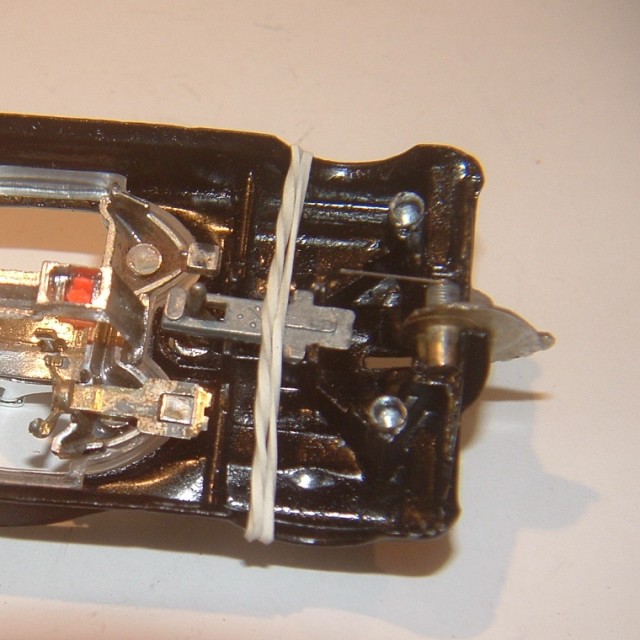
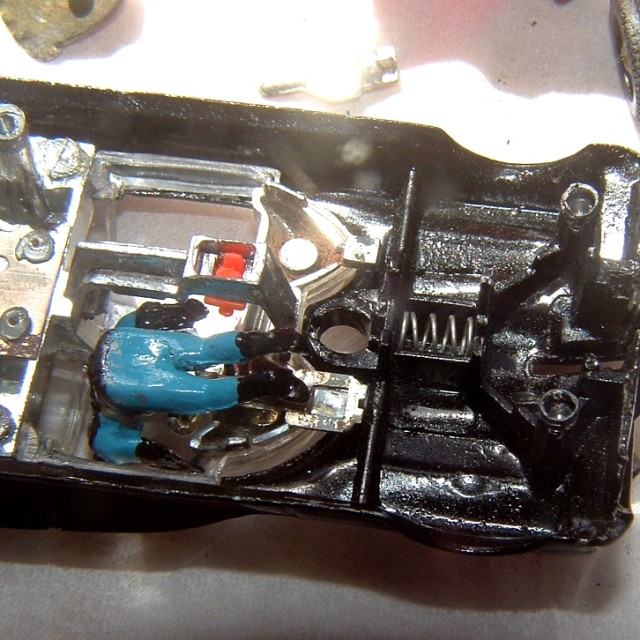
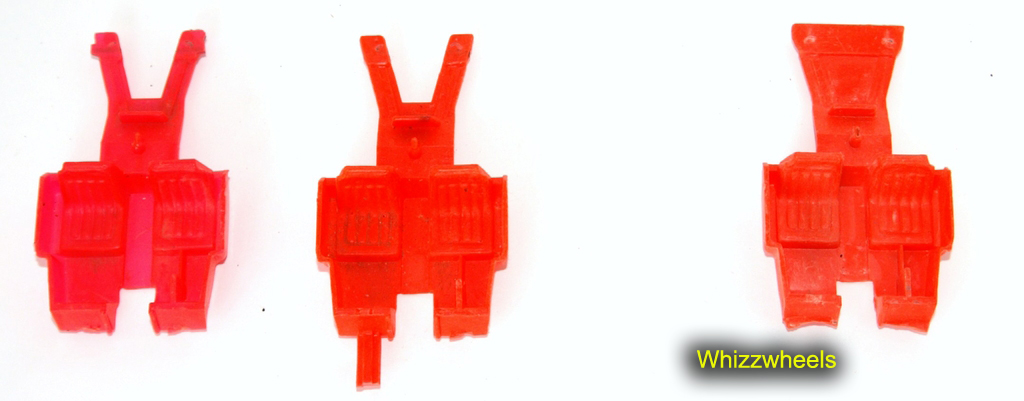
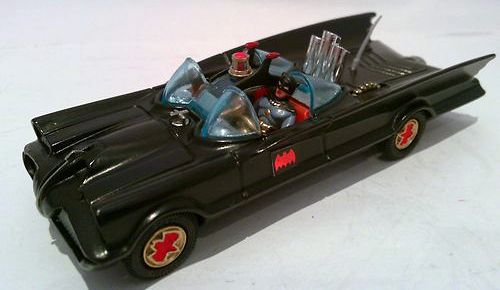
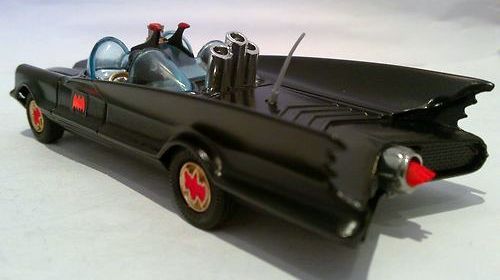
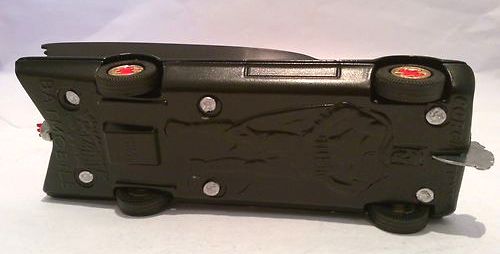
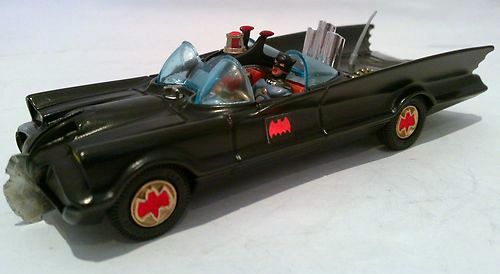
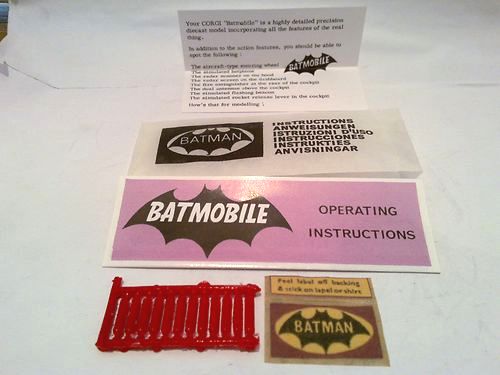
Spare Parts Corgi TV Batmobile :
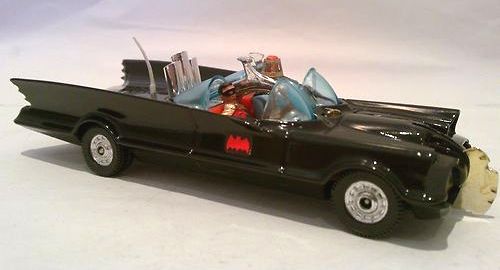
 |
Photograph ©Eric Matheson
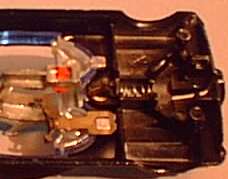
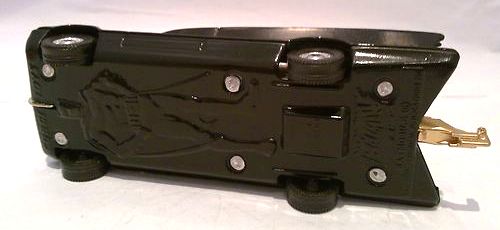
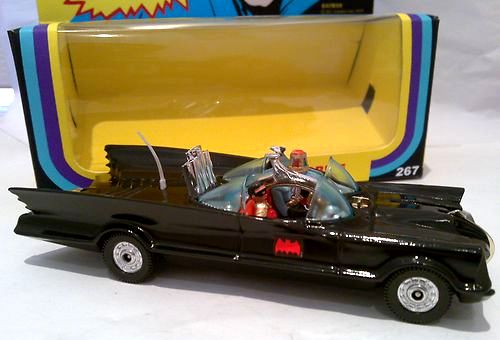
 |
Photograph ©Eric Matheson
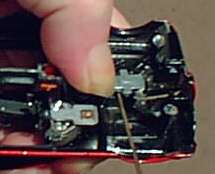
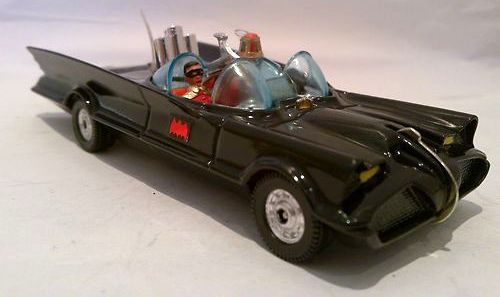
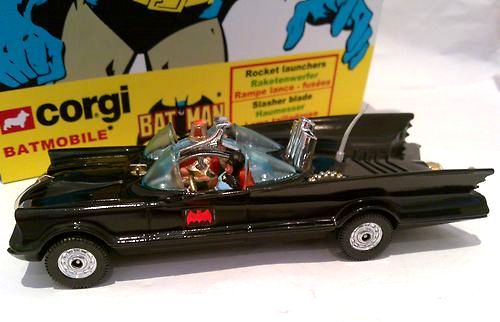
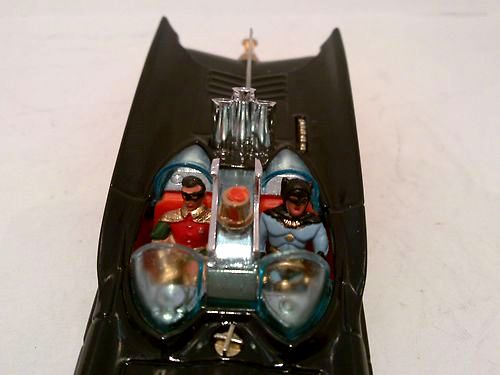
 |
Photograph ©Eric Matheson
How do I replace the canopy?
To replace the canopy properly, you must remove the six rivet heads on the underside of the car. This is most easily accomplished by drilling them off. I do this in three steps. First, I make a small pilot hole (so that the larger drill bits don't slip off the rivet head later on). To do this I use a Dremel rotary tool and a small engraving bit (such as Dremel bit #106) for the first pilot hole. Then I make the pilot hole larger with a 3/32" drill bit and I finally use a larger drill bit (approx. 3/16") to actually remove the head. After the body halves have been separated, there are three more rivets to remove to get at the canopy. To reassemble the car, you can use a good epoxy to substitute for the rivet heads. If it is applied carefully and if it is a good consistency, the epoxy drops can actually look very similar to the original rivets heads. After it is cured, paint the epoxy "rivet heads" black (to match the car) or dull silver (to match the original rivet heads). See my response to FAQ #4 below concerning the use of rivets or screws to reassemble Corgi Batmobiles. Some people inquire if it is possible to replace a canopy without disassembling the car. To do so would require you to cut out as much of the original canopy as possible and then cut or grind the replacement canopy to somehow fit, then glue it in place. I haven't seen the results of this type of operation, but I don't think I would like it. So from my point of view, you must disassemble the Batmobile to replace the canopy.
Do I need to disassemble the car to replace the antenna?
To do it properly, yes. Many people assume that the original plastic antennas are somehow "screwed in". They are not. They are inserted from underneath the rear deck (or "trunk"). However, if the only thing your car needs is a new antenna, it's worthwhile, in my opinion, to attempt a less invasive repair. Here are two options to consider:
A. Remove the base of the original antenna from the Batmobile. The best way I've found to do this is to use a rotary tool and Dremel bit #106. Grind down through the remaining plastic base of the original antenna until contacting the silver metal base that the antenna sits on. You can then use some needle point tweezers to remove the remaining parts of the antenna base from the antenna socket. Removing those remnants is difficult and you may be able to just leave them in place. Either way, on your replacement antenna, trim the outer edge of its base so that the base of the new antenna will fit in the socket hole. After verifying that it will fit, apply a small amount of epoxy into the hole and/or bottom of the antenna and set it in place. You will probably need to support the antenna in its desired position until the epoxy cures.
B. If you don't have a rotary tool or don't want to risk damaging your car by removing the base of the original antenna, you can try this approach: If the thick base of the original antenna is still present on the car (and it usually is), you can file the top of it so that it is flat and smooth. Obtain a replacement antenna that has a thick base similar in diameter to the original base (approx. 1/16"). All the antennas I sell can be used this way. Cut off a portion of the replacement base, leaving just a small portion of the thicker base portion. File it if necessary so that it will mate flush against the top of the original base. Use a small amount of epoxy to attach it to the original base. My experience is that regular model cement does not work very well on the type of plastic the antennas are made from. Since this method of repair won't be as sturdy as replacing the whole antenna, you will need to be careful not to bump the repaired antenna in the future.
Do you use rivets or screws to reassemble your Batmobiles?
Usually neither. Some people do use rivets or screws to reassemble their Batmobiles but I usually use epoxy to replace the rivet heads. By way of explanation, if you open up a Corgi Batmobile, you can see how that the original "rivet heads" are actually part of the same single piece of metal as the upper body half. To install screws or rivets, you have to drill a hole in the rivet posts in the upper body. But the metal posts aren't that thick and are fairly soft and brittle metal. Often, when people drill into this and force a screw or rivet into the hole, it forms cracks in the rivet posts. Damaged rivet posts are almost inevitable when using self-tapping screws, especially for a #4 screw size. This is the screw size I've usually seen installed because its head is large enough to hold the bottom of the car in place without washers. Often the car will still hold together with broken rivet posts but I really hate to see this happen. In a few cases, such as if you are the lucky owner of one of my "Electronic Corgi Batmobiles" (a customized Corgi Batmobile with a flashing red beacon), I'm willing to tap holes for very small machine screws to replace the rivet heads. This makes it easier to change the battery. But rather than risk unnecessary and irreversible damage to the rivet posts, I generally reassemble the cars with epoxy "rivet heads" as this does no damage to the rivet posts. It does make it more difficult than screws to re-open the car if you ever want to again. But my assumption is that grown-ups will take better care of their Batmobiles now than they did as a kid and it won't be necessary to reopen the car again (which was Corgi's original concept as well).
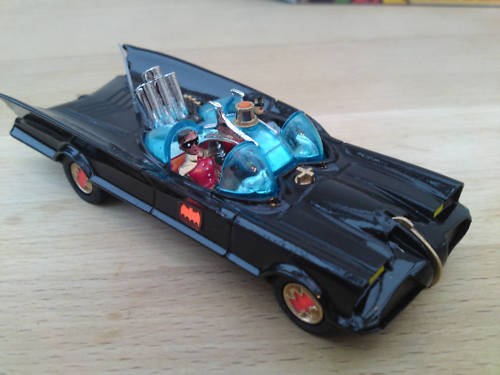
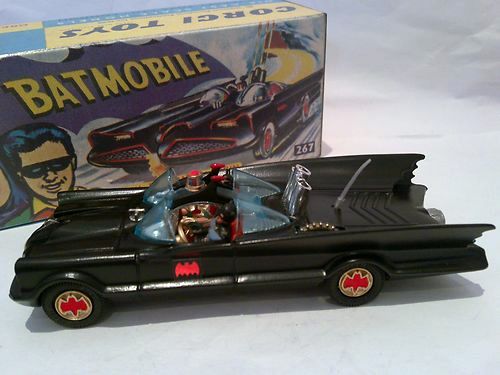
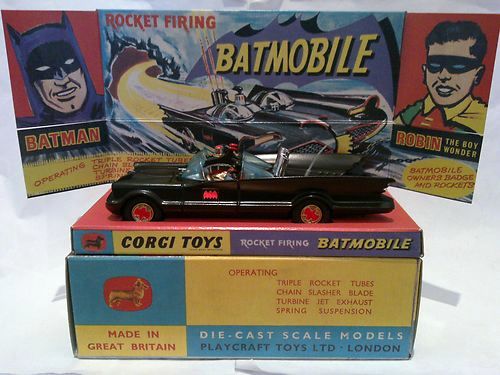
Restore the 267 Corgi Batmobile
Step1
|
 |
The
above picture of the Corgi 267 Batmobile. As you can see it came straight
out of a scrap box for $1.50. We are going to restore this beauty back
to its original condition. You will see quite a few pieces are missing
or broken. This is no problem as replacement parts can be purchased
from ToyTinker . In the following stages the pictures may be of a different
model but don't worry this restoration project works for all models.
Step 2 |
 |
The
first step is to drill out the 6 rivets holding the base plate to the
car. Use a 1/32" drill. Drill a pilot hole to a depth of 1/4".Next
using a 3/32" drill open the holes to the new size at the same
depth.
Step 3 |
 |
Next
use a 3/8" drill to countersink the tops off the rivets. Do not
drill to deep in this operation just enough to take the top off the
rivet.
Step
4 |
 |
Now
carefully remove the base plate. Study where all the parts are situated.
Make notes or take a picture. In this picture you will see the front
suspension arms are broken off. One piece by the front wheel at the
top of the picture. The other at the back near the tow hook. Discard
these they are of no further use.
Step 5 |
 |
Now
that the base has been removed you can remove the steering wheel, seating,
dash board, wheels and broken suspension parts. The pointer is pointing
to one of three rivets holding the rocket firing mechanism in place.
This part also holds in place the windscreens, antenna , rocket tubes,
rocket firing wheel, and the indicator horns. Note the chain cutter
mech. at the front and the exhaust at the rear. Carefully countersink
the tops off the three rivets holding the firing mech. frame.
Step
6 |
 |
Now
remove the rocket firing mech. frame, firing wheel, rocket tubes, what
is left of the antenna and the windscreen.
Step 7 |
 |
Next
remove the exhaust and flame. Then remove the chain cutter. This is
in five parts. The button that protrudes through the hood. The trigger
mech. the trigger mech. spring. The chain cutter and chain cutter spring.
Note the position these are set.
Now you can strip the paint from the body and base plate. To do this I use an all purpose paint and varnish remover. When using the stripper work in a well ventilated area and wear protective gloves. This stuff burns. You will find that the paint on the base plate comes off very easily. The body is a different matter normally you will have to use the paint remover twice or put the body in a metal tray completely cover and leave over night. When all the paint is off wash well with soapy water. You will find when washing the fumes are very strong try not to inhale better still wear a mask
Step 8 Now that all the paint has been removed and the parts are nice and clean we can make the repair to the front suspension. The parts that are broken off can be discarded trying to glue these back in place is not successful. In the following pictures you will see the model I am using is already painted so imagine it is unpainted. |
 |
To
repair the front suspension we need to drill through the cross member.
Use a 1/32" drill. Using the axle well as a guide drill through
the cross member on both sides. Drill through at a slight angle. I do
this by hand I find if you use an electric drill it is to fast and breaks
the fine drill bit. In the picture I have used a piece of wire to show
where to drill. The drill is much finer and hard to see in a picture.
Step 9 |
 |
When
the drilling is finished cut two pieces of 1/32" piano wire 2"
long. Place the front axle in place then fit the wire through the holes
and push through to the centre rivet holes. Make sure that the wires
do not foul the rivet holes at the front. No glue is needed to hold
these wires in position their own tension holds them in place. Paint
the base before fixing permanent.
Now that the front suspension is fixed you can proceed with the painting. Clean the body and base with a fine wire wool. Now spray both with a grey undercoat. I use an ordinary car primer. When dry rub down gently with a fine wire wool. For the finishing coats I use a high gloss car spray paint and apply two to three coats leaving about 15 minuets between coats. Don't apply to much at one time to avoid runs in the paint. Now leave the car to dry for about 24 hours. Then you can start to reassemble. Step 10 |
 |
First
we have to fit the indicator assembly to the new screen. Both these
parts are new replacement parts so do need cleaning up by cutting off
the mold flash.
Step 11 |
 |
Next
fit the screen into the body. You will find with the new screen it will
fit perfect without any adjustment.
Step 12 |
 |
Now
fit the rocket tubes. Then fit the rocket firing wheel and antenna.
All of these parts can be purchased separately
Step 13 |
 |
Now
fit the rocket firing mechanism and main frame. Make sure it is pressed
home firmly over the three rivets. When in place apply a small amount
of superglue to the three rivets this will hold the plate in place permanently.
Also when the base plate is fitted this piece will be secured.
Step
14 |
 |
Next
fit the dash board, steering wheel, chain cutter release button (this
piece fits through the hood). Then the chain cutter trigger spring.
Step 15 |
  |
Next
fit the chain cutter retaining lever over the button and spring. Hold
in place with the thumb insert a piece of wire into the spring and pull
back till the lever falls into place.
Step 16 |
 |
Fit
spring on chain cutter and fit into car. Fit exhaust and flame
Step 17 |
 |
The
above picture shows how to fit the exhaust on the later model the early
model is slightly different as you will see in the next stages.
Step 18 |
 |
This
next part is tricky. Fit batman into the cockpit under the steering
wheel.
Step 19 |
 |
Now
fit the seating. This is the tricky bit trying to get batman into his
seat without disturbing the steering wheel and dash board. You can fit
batman after the complete assembly but it is more difficult to get him
into his seat correctly.
Step 20 |
 |
Now
fit the back axle into position. Note the cam in the centre of the axle. |
 |
Now
fit the exhaust and pulsating flame. Make sure that the hole in the
flame goes over the cam in the centre of the rear axle. Now fit the
base plate back to the car. When doing this start from the front of
the car pushing in the spring on the chain cutter.
Step 21 |
 |
To
secure the base plate you can use self tapping screws or a rivet. The
rivets are a good fit in the 3/32" hole but are best secured with
a drop of superglue. The self tapping screws are my favourite as the
car is easily taken apart if needed
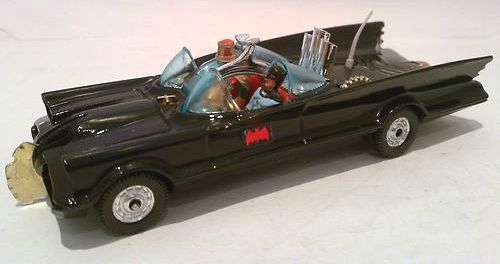
Well Done, You've finished!! |
 |
 |
 |
 |
|
 |
 |
 |
 |
 |
 |
 |
 |
 |
 |
 |
 |
 |
 |
 |
 |
 |
 |
 |
 |
 |
 |
 |
 |
 |
 |
 |
 |
 |
 |
 |
 |
 |
 |
 |
 |
 |
 |
 |
 |
 |
 |
 |
 |
 |
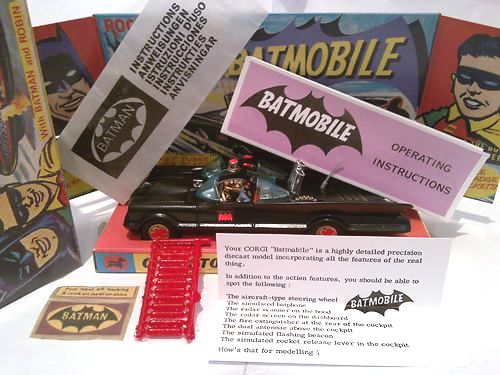
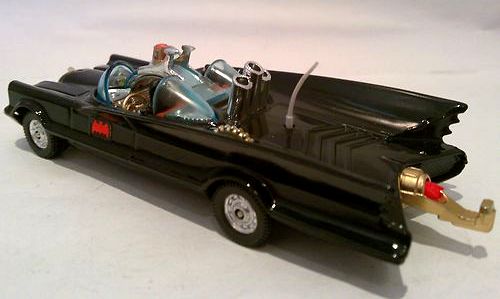
The main way to spot a restoration is by the base rivets. The ones on this model are very close indeed to originals in appearance, but only experience would give the game away. Many lesser restored models use poor quality rivets or otherwise instantly recogniseable replacements Other ways to tell are by the quality of the screen assemblies. Originals used a very light type of plastic which cracked easily. If you tap the screen with the back of your fingernail you hear and 'feel' a light click. Modern replacement units give a duller sound. and many look a much darker colour aquamarine blue. The units on these models I have for sale are expertly manufactured, and it is only experience that reveals their lack of originality. The wheels are cast in gold and easily available...BUT, originals tarnish easily and rarely remain completely shiny.
Reproduction
screens are usually of a thicker grade plastic....which is easily detectable,
and some are just plain poor! This is especially true in the case of clear
screen variants.
Colours should be a semi transparent aquamarine, a pastel blue ( quite rare
), or clear. Look for darker blues and again thicker plastic to spot fakes.
I have found in general that the fingernail tap-test is pretty reliable.....and
when you spot one reproduction part, you can usually spot another !
Repro' chrome rocket tubes and horns are often poorly finished at the edges,
but can nevertheless be difficult to spot, depending upon who made them.
Repro' aerials vary widely in quality, but are usually of a clearly thicker
grade soft plastic. The originals were thinner, and often became brittle,
so were prone to snapping just above the base.
Red whizzwheel Batmobile variants are the most desireable, and can command
big money....Whizzwheels are fairly easy to replace undetected, so look for
(a)imperfections around the edges of the chrome insert, it should be perfect,
and (b) evidence that the actual wheel may have been removed from a sprue.
Also...in the final run of late 70's series wide whizzwheel models, the headlights
were factory painted orange, instead of the previous yellow, so look for that
one.
I have to say that restored whizzwheel versions are rarer than the Series
1 bat-hub models, but are out there just the same.
As for boxes... some are very poor and some are incredibly good, and the inexperienced
buyer really can very easily be misled. With this subject especially, the
best advice is seek assistance first !
 |
 |
 |
 |
 |
 |
 |
Spare Parts Corgi TV Batmobile :
00heaven2012 who's restoring the cars is a really nice guy. In fact i've had a look at his restorations and even i'm considering buying one which i never thought i'd do!!!
He does a fantastic job on the cars and sells them as restored, but even he's agitated about whats happening once the cars are sold and is threatening to report them to ebay.
00heaven2012 on ebay and his restorations are SUPERB!!!! They even look original and he has had someone who has bought one off him, changed the figures and passed it off as original on ebay!!!!! Brett sold it for £75, the other bloke sold it for £160!!!
00heaven2012 has warned him he will report him to ebay for fraud, he puts this info on ebay now on his sales :
PLEASE DONT BUY MY RESTORED CARS AND TRY TO PASS THEM OFF TO SOMEONE ELSE AS "MINT...ORIGINAL..UN-RESTORED"
FOR ONE ..IT DONT MAKE ME HAPPY...AND TWO..I WILL PERSONALLY CONTACT EBAY AND SPILL THE BEANS....OH, AND ITS ALSO AGAINST THE LAW!!!!
BUY MY WORK FOR YOURSELF TO ENJOY...NOT TOO MAKE MONEY OFF MY BACK!!!!
AND OWN YOURSELF THE FINEST 267 BATMOBILE RESTORATION YOU WILL SEE..
I thoroughly recommend his restorations and i love them.
![]()
CORGI 267
BATMOBILE "ULTIMATE GOTHAM"
"ULTIMATE RESTORED"
SO CAR WAS STRIPPED DOWN AND LOVINGLY RESTORED TO A VERY HIGH STANDARD
BODY HAS BEEN DE-DENTED ALL OVER AND ALL FIN EDGES HAND SANDED ,RESPRAYED
IN SATIN BLACK AS WAS THE VERY FIRST ISSUE CARS.SUPERIOR PAINTJOB AND DETAIL.
NEW STATE OF THE ART SCREENS...THESE ARE THE BEST THAT YOUR MONEY CAN BUY..VERY
CORGI AUTHENTIC LOOKING,UNLIKE SOME IVE SEEN!!!!
NEW CHROME TUBES...NEW DASH..
"CULLEN" DAY-GLO DOOR BAT DECALS
ORIGINAL GOLD BEACON AND PIN
NEW AERIAL FITTED,WITH POLISHED INNER CAGE AND VALETED INTERIOR...GOLD BAT-WHEEL
TO STEER!!!
BOTH FIGURES ARE ORIGINAL CORGI 60"s ISSUE...AND HAVE BEEN HAND RE-DETAILED
TO A SUPERB STANDARD...DONT TRY TO GET THEM OUT AS YOU WILL BUST THE SCREENS...THEY
WERE FITTED AS I BUILT UP THE CAR...LARGE ROBIN...LARGE BATMAN
FRESHLY REGILDED GOLD AND RED BAT-HUBS WITH DAY-GLO BAT EMBLEMS...SUPERB ATTENTION
TO DETAIL AND WELL WORTH SPENDING 20 MINS A WHEEL!!!! NEW CORGI TYRES AS WELL
TO SET THE RUNNING GEAR OFF...LOVELY!!
PULSE JET FLAMER EXHAUST WITH DAY-GLO FIRE...HIGH POLISHED EXHAUST PIPE
FULL SUSPENSION ALL ROUND...PIANO WIRED FRONTS AND STANDARD REARS...BOTH WILL
NEVVER FAIL AGAIN!!!!
RERIVETED BASE WITH SAME FINISH AS UPPER BODY
BLACK INDICATOR HORNS WITH RED DETAILING...( T.V CAR STYLEY!!)
AND TO DISPLAY ..PROTECT,AND SHOW CAR...A BRAND NEW SUPER" COPY "OF
THE ORIGINAL BOX..PLINTH...TOTALLY CORGI ACCURATE AND VERY FIRM,WITH CORRECT
SIZES AND SHADING...SO GOOD IN FACT THEY LOOK LIKE BRAND NEW ORIGINALS...BUT
THEY AINT,OK!!.... REPLICAS.
ALSO BAT INSTRUCTION SHEET...BAT INFO FLYER SHEET..FABRIC EXCELLENT COPY BADGE(THE
BEST) AND 12 ON THE SPRUE ATOMIC MISSILES...ALL FAITHFULL COPIES OF THE ONES
CORGI SUPPLIED FROM NEW
SO ..... A.BRAND NEW LOOKING 267...WITH ATTENTION TO DETAIL AND A WONDERFULL
SELECTION OF BAT-ACCESORIES
 |
 |
uBPiEbgrSCw%7E%7E60_12.jpg) |
 |
 |
 |
 |
 |
 |
 |
 |
CORGI 267 BATMOBILE "ULTIMATE WHIZZWHEELER"
"ULTIMATE
RESTORED"
THIS CAR WAS A USUAL 1970"s PLAYWORN,SCUFFED AND GENERALLY "MULLERED"
BATMOBILE
SO CAR WAS STRIPPED DOWN AND LOVINGLY RESTORED TO A VERY HIGH STANDARD INDEED
BODY HAS BEEN DE-DENTED ALL OVER AND ALL FIN EDGES HAND SANDED ,RESPRAYED
IN GLOSS BLACK... SUPERIOR PAINTJOB AND DETAIL....NO CHIPS ..DENTS,OR DINGS!!!!
NEW STATE OF THE ART SCREENS...THESE ARE THE BEST THAT YOUR MONEY CAN BUY..VERY
CORGI AUTHENTIC LOOKING,UNLIKE SOME IVE SEEN!!!! THESE LOOK AS "FACTORY"
AS YOU CAN BUY ON THIS PLANET
NEW CHROME TUBES...NEW DASH..DETAILED RED BAT-FONE,NEW AERIAL
"ORIGINAL" AND REFITTED DAY-GLO DOOR BAT DECALS,SUPERB BIT OF HANDYWORK..IF
I SAY SO MYSELF!!!
ORIGINAL GOLD BEACON AND PIN
POLISHED INNER CAGE AND VALETED INTERIOR...GOLD BAT-WHEEL TO STEER!!!
BOTH FIGURES ARE TOP QUALITY RESIN CAST ,WITH A NEW MATT HANDPAINTED APPEARENCE
ALL DONE BY ME AND ARE AS GOOD AS THE CORGI ORIGINALS......DONT TRY TO GET
THEM OUT AS YOU WILL BUST THE SCREENS,TRUST ME...THEY WERE FITTED AS I BUILT
UP THE CAR...LARGE ROBIN...LARGE BATMAN, AND THEY DONT COME OUT WITHOUT PAINT
DAMAGE AND AN EMAIL TO ME SAYING..."CAN YOU PLEASE REPAINT MY CAR AS
I TRIED TO GET BATMAN OUT TO PLAY WITH ETC"!!!!
SUPERB ORIGINAL WHIZZWHEELS,WITH UNSCUFFED LOOK...NICE!
GOLD POLISHED FRONT CHAIN SLASHER BLADE,,ALL WORKING STUNNINGLY WELL
STATIC JET FLAMER EXHAUST WITH DAY-GLO FIRE...REGILDED EXHAUST PIPE AND TOWBAR
FULL ORIGINAL SUSPENSION ALL ROUND! SUPERB AND BOUNCY AGAIN
RERIVETED BASE WITH SAME FINISH AS UPPER BODY
AND TO DISPLAY ..PROTECT,AND SHOW CAR...A BRAND NEW SUPER" COPY "OF
AN ORIGINAL CORGI BOX..WINDOW DESIGN WITH A LARGE BATMAN FRONT AND REAR..THESE
BOXES ARE SO GOOD WITH ATTENTION TO DETAIL.... THEY LOOK LIKE BRAND NEW ORIGINAL...BUT
AINT,OK!!.... REPLICA/REPRODUCTION
SO ..... A.BRAND NEW LOOKING 267...WITH ATTENTION TO DETAIL
 |
 |
ZMCg%7E%7E60_12.jpg) |
 |
 |
 |
 |
 |
 |
 |
 |
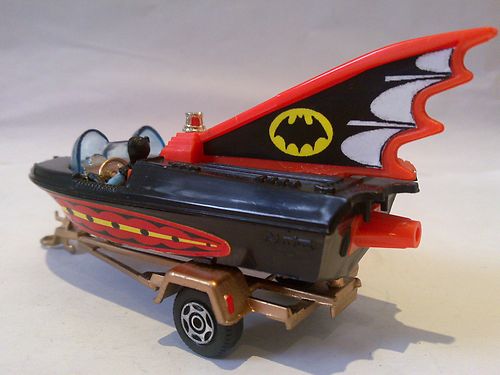
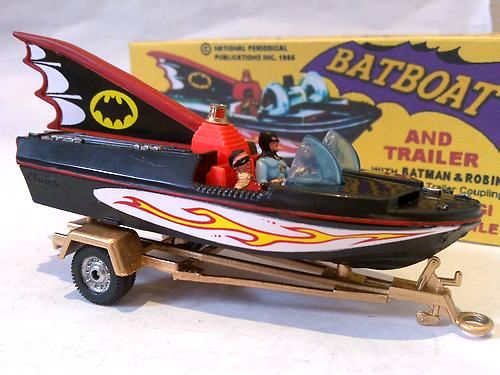
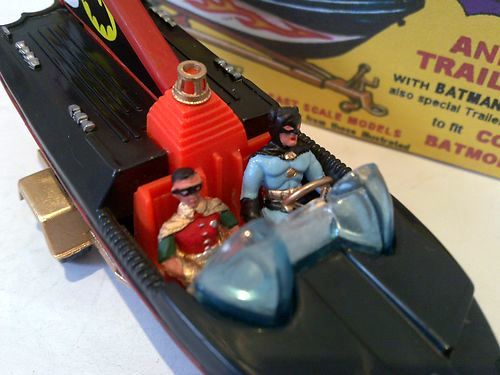
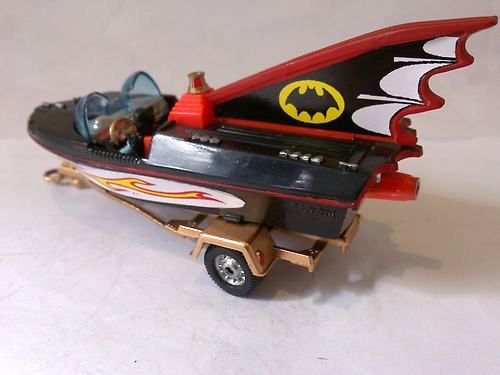
CORGI 107 BATBOAT AND TRAILER FOR THE BATMOBILE
+WITH TWO HAND DETAILED FIGURES
REVAMPED BATBOAT...POLISHED, COMPLETE HULL WITH ALL TOWHOOKS
ORIGINAL
ORANGE STICKERS ON HULL
ORIGINAL DASH AND SCREENS ALL A1
GOLD BEACON
FIN HAD SOME MINOR DAMAGE SO THE REAR STICKERS WERE ADDED, AND SUIT
THE BOAT WELL
TWO NEW FIGURES ..PRO PAINTED BY ME AND LOOK AMAZING IN THE BOAT ON
SHOW
TRAILER HAS BEEN RE-GOLDED!!!
WHIZZWHEEL TYRE TYPE
ALSO TO DISPLAY THE BOAT...A BRAND NEW COPY WINDOW BOX WHICH IS PERFECT
IN EVERY WAY AND VERY AUTHENTIC LOOKING
SO A VERY NICE AGAIN BATBOAT ,COMPLETE WITH FIGURES AND NEW BOX...ALL
STUNNING
 |
 |
 |
(t4GKBP,gUzGTRw%7E%7E60_12.jpg) |
 |
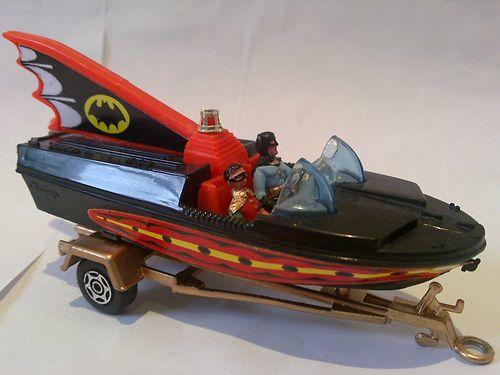
CORGI
107 BATBOAT
RESTORED TO A NICE CONDITION USING,VARIOUS SURPLUS PARTS FROM
THE "ULTIMATE" BATBIN!!!!!...SO... A BUILT UP 107
BOAT,FROM BITS!!! TO MAKE ONE GOOD ONE!!!
ORIGINAL HULL,WITH SOME STRANGE WARPING OF THE LOWER UNDERSIDE...STRANGE
MUST OF BEEN ON A RADIATOR IN A PAST LIFE! BUT NOT IN VIEW
WHEN ON TRAILER
UPPER HULL ALL COMPLETE WITH NEW FIN DECALS APPLIED TO SMARTEN
UP THE BOAT,TIN FIN STYLE
NEW HULL FLAMES IN WHITE
ORIGINAL SCREENS VERY GOOD STILL
PAINTED DASH,NEW WHEEL
RECLAIMED ORIGINAL STYLE BEACON
WHIZZWHEELS TRAILER,HAS BEEN REPAINTED WELL AND WHEEL CENTRES
REDETAILED,
NEW RESIN CAST ACCURATE FIGURES...HAND DETAILED BY ME TO A
TOP SPEC AND LOOK FANTASTIC IN THE BOAT
 |
 |
 |
 |